前言
本文将介绍Vue-router的使用。
Vue-router
前端路由
前端路由的核心就是改变URL,但是页面不进行整体的刷新。
在配置Vue-router时有两种模式,分别为:hash模式(默认)、history模式。
hash模式
URL的hash也就是锚点(#), 本质上是改变window.location的href属性,但是可以通过直接赋值location.hash来改变href, 但是页面不发生刷新。
这里建立一个带路由的项目,启动服务,在控制台输入location.hash = 'xxx'来改变URL:

history模式
history接口有5种模式改变URL而不刷新页面。
-
pushState:history.pushState({},'','/foo')
会有一个堆栈结构,意味着可返回上一页。
-
replaceState:history.replaceState({},'','/foo')
不能回退上一页。
-
back:history.back()
-
forward:history.forward()
-
go:history.go(index)
history.back() <==> history.go(-1)
history.forward() <==> history.go(1)
安装
有两种安装方式:
使用
步骤
路由的使用步骤如下:
- 导入路由对象,并且调用
Vue.use(VueRouter)
- 创建路由实例,并且传入路由映射配置
- 在Vue实例中挂载创建的路由实例
如果是手动创建,则首先安装vue-router,在src文件夹下创建一个router文件夹,在其中新建一个index.js文件:
基本框架如下:
1
2
3
4
5
6
7
8
9
10
11
12
13
14
15
16
17
18
|
import VueRouter from 'vue-router'
import Vue from 'vue'
Vue.use(VueRouter)
const routes = [
]
const router = new VueRouter({
routes,
})
export default router
|
当然在main.js文件中需要在Vue实例中注册router实例:
1
2
3
4
5
6
7
8
9
10
11
| import Vue from 'vue'
import App from './App'
import router from './router'
Vue.config.productionTip = false
new Vue({
el: '#app',
router,
render: h => h(App)
})
|
注意:在导入的时候,如果路径末尾为一个文件夹,则会自动导入该文件夹下的index.js文件。
App.vue文件代码如下:
1
2
3
4
5
6
7
8
9
10
11
12
13
14
| <template>
<div id="app">
</div>
</template>
<script>
export default {
name: 'App'
}
</script>
<style>
</style>
|
下面就需要配置路由的映射关系:
首先在components文件夹(组件都定义在此)下新建Home.vue和About.vue文件:
Home.vue文件:
1
2
3
4
5
6
7
8
9
10
11
12
13
14
15
16
| <template>
<div>
<h2>我是首页</h2>
<p>我是首页内容</p>
</div>
</template>
<script>
export default {
name: "Home"
}
</script>
<style scoped>
</style>
|
About.vue文件:
1
2
3
4
5
6
7
8
9
10
11
12
13
14
15
16
| <template>
<div>
<h2>我是关于页面</h2>
<p>我是关于内容</p>
</div>
</template>
<script>
export default {
name: "About"
}
</script>
<style scoped>
</style>
|
下面在index.js文件的routes属性中配置映射关系(一个映射关系就是一个对象):
1
2
3
4
5
6
7
8
9
10
11
12
13
| import Home from '../components/Home.vue'
import About from '../components/About.vue'
const routes = [
{
path: '/home',
component: Home
},
{
path: '/about',
component: About
}
]
|
说明:
每一个对象中:
path属性:用于配置URLcomponent属性:用于注册模板
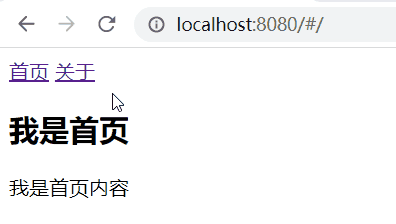
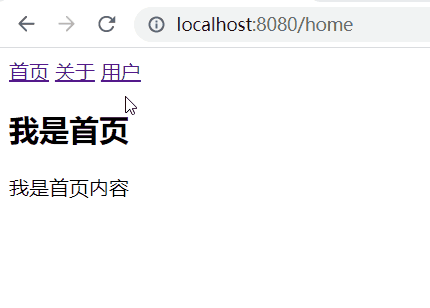
现在就可以使用这两个router组件了,在App.vue模板中利用<router-link>和<router-view>:
1
2
3
4
5
6
7
8
9
10
11
12
13
14
15
16
17
| <template>
<div id="app">
<router-link to="/home">首页</router-link>
<router-link to="/about">关于</router-link>
<router-view></router-view>
</div>
</template>
<script>
export default {
name: 'App'
}
</script>
<style>
</style>
|
说明:
<router-link>标签:用于关联路由组件,利用to属性<router-view>标签:用于展示路由模板,运行时会自动渲染为<a>标签,并用router模板对其替换
效果如下:
路由的默认路径
如果想在最初进入页面时就加载一个默认路由(例:首页页面),则可以进行路由的默认路径配置:
在index.js文件中的routes属性中新增默认路径:
1
2
3
4
5
6
7
8
9
10
11
12
13
14
| const routes = [
{
path: '/',
redirect: '/home'
},
{
path: '/home',
component: Home
},
{
path: '/about',
component: About
}
]
|
说明:
path:配置的是'/',表示根路径(默认路径)redirect:是重定向,可以选择设置过的路由
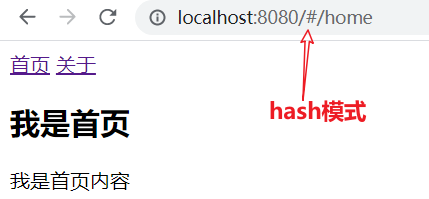
hash模式和history模式
之前提到过,创建Vue项目时,默认的是hash模式,可以看到在URL处会有#:
通过在index.js文件中的router对象中配置mode可以将其改为history模式:
1
2
3
4
| const router = new VueRouter({
routes,
mode: 'history'
})
|
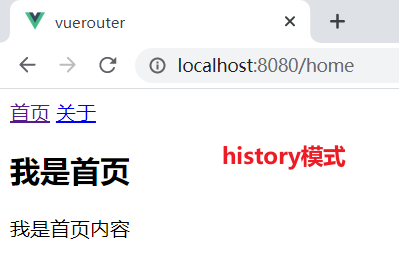
html5中的history模式则在URL中去除了#。
router-link标签补充
-
to属性:用于链接跳转的路由
-
tag属性:默认<router-link>标签会被渲染为<a>标签,如果想让其渲染为其他标签,可以设置tag属性,例:将其渲染为button按钮:
1
2
3
4
5
6
7
| <template>
<div id="app">
<router-link to="/home" tag="button">首页</router-link>
<router-link to="/about" tag="button">关于</router-link>
<router-view></router-view>
</div>
</template>
|
-
replace属性:在每一次点击路由跳转时默认为pushState,即可以点击前/后按钮实现历史页面的跳转,如果不希望如此,将其修改为replaceState模式,则只需在<router-link>标签中添加replace即可:
1
2
3
4
5
6
7
| <template>
<div id="app">
<router-link to="/home" replace>首页</router-link>
<router-link to="/about" replace>关于</router-link>
<router-view></router-view>
</div>
</template>
|
-
active-class属性:
开发者工具查看页面会发现在执行路由跳转的标签中存在两个class属性,其中router-link-active可以对其使用,链接css属性。

例如:实现点击后变红:
1
2
3
4
5
6
7
8
9
10
11
12
13
14
15
16
17
18
19
| <template>
<div id="app">
<router-link to="/home" >首页</router-link>
<router-link to="/about" >关于</router-link>
<router-view></router-view>
</div>
</template>
<script>
export default {
name: 'App'
}
</script>
<style>
.router-link-active {
color: #f00;
}
</style>
|

当然,如果觉得该属性名字太长,想对其进行修改(一般不这么操作),可以有如下两种方式:
路由代码跳转
如果不想使用原有的<router-link>标签进行路由跳转,还可以在普通标签中添加方法,使其达到同样的效果,以<button>标签(按钮)为例:
1
2
3
4
5
6
7
8
9
10
11
12
13
14
15
16
17
18
19
20
21
22
23
24
25
26
27
| <template>
<div id="app">
<button @click="linkToHome">首页</button>
<button @click="linkToAbout">关于</button>
<router-view></router-view>
</div>
</template>
<script>
export default {
name: 'App',
methods: {
linkToHome() {
this.$router.push('/home'),
console.log("已跳转至首页")
},
linkToAbout() {
this.$router.push('/about'),
console.log("已跳转至关于页面")
}
}
}
</script>
<style>
</style>
|
说明:
在Vue-router的源码中默认给每一个组件都增加了一个$router属性,所以可以利用该属性进行路由的链接
同样的还有$router.replace('xxx')方法
动态路由
还有一种十分常见的场景,即某些页面的path路径是不确定的,比如用户页面,通常情况下URL末尾会带有实际用户的ID,这种不确定的路由称为动态路由,下面以用户页面案例来说明:
首先需要创建一个用户路由,在components文件夹下新建一个User.vue文件:
1
2
3
4
5
6
7
8
9
10
11
12
13
14
15
16
| <template>
<div>
<h2>我是用户</h2>
<p>我是用户页面内容</p>
</div>
</template>
<script>
export default {
name: "User"
}
</script>
<style scoped>
</style>
|
然后在index.js文件中的routes中添加该路由(注意先引用)
1
2
3
4
5
6
7
8
9
10
11
12
13
14
15
16
17
18
| const routes = [
{
path: '/',
redirect: '/home'
},
{
path: '/home',
component: Home
},
{
path: '/about',
component: About
},
{
path: '/user/:id',
component: User
}
]
|
最后在App.vue文件中的data属性中添加userID(之后实际项目中从后端动态获取),并且在模板中的<router-link>标签中链接该属性:
1
2
3
4
5
6
7
8
9
10
11
12
13
14
15
16
17
18
19
20
21
22
23
| <template>
<div id="app">
<router-link to="/home" >首页</router-link>
<router-link to="/about" >关于</router-link>
<router-link v-bind:to="'/user/'+userID" >用户</router-link>
<router-view></router-view>
</div>
</template>
<script>
export default {
name: 'App',
data() {
return {
userID: '张三'
}
}
}
</script>
<style>
</style>
|
效果如下:

如果希望在跳转的路由页面中显示出用户信息,则需要在User.vue文件中使用$route属性:
1
2
3
4
5
6
7
8
9
10
11
12
13
14
15
16
17
18
19
20
21
22
23
| <template>
<div>
<h2>我是用户</h2>
<p>我是用户页面内容</p>
<p>我是{{userID}}</p>
<p>我是{{$route.params.id}}</p>
</div>
</template>
<script>
export default {
name: "User",
computed: {
userID() {
return this.$route.params.id
}
}
}
</script>
<style scoped>
</style>
|
说明:
这里使用了$route属性,注意与$router属性的区别。
-
$router属性:会寻找VueRouter路由对象实例
-
$route属性:会定位到路由对象中的routes属性,routes属性是一个关联各个路由的列表,在该列表中哪一个路由处于活跃状态,则routes属性就会定位到该活跃路由
params即参数,.后面跟着的参数名对应于index.js文件中routes属性中关联的动态路由的参数名(本例中即:path: '/user/:id')
效果如下:
路由懒加载
当打包构建应用时,Javascript包会变得非常大,影响页面加载。如果能把不同路由对应的组件分割成不同的代码块,然后当路由被访问的时候才加载对应组件,这样就会更加高效。
原先直接打包后,很多个路由页面会被打包在一个js文件中,当访问页面时就会一次加载全部的js代码,但是有些内容是暂且不需要的(不必加载)。
实现路由懒加载的方式只需要在index.js文件中修改路由的导入方式:
1
2
3
4
5
6
7
8
9
10
11
12
13
14
15
16
17
18
19
20
21
22
23
24
25
26
27
28
29
30
31
32
33
| import VueRouter from 'vue-router'
import Vue from 'vue'
const Home = () => import('../components/Home.vue')
const About = () => import('../components/About.vue')
const User = () => import('../components/User.vue')
Vue.use(VueRouter)
const routes = [
{
path: '/',
redirect: '/home'
},
{
path: '/home',
component: Home
},
{
path: '/about',
component: About
},
{
path: '/user/:id',
component: User
}
]
const router = new VueRouter({
routes,
mode: 'history',
})
export default router
|
当然也可以在component中直接导入(不建议这样写):
1
2
3
4
5
6
7
8
9
10
11
12
13
14
15
16
17
18
| const routes = [
{
path: '/',
redirect: '/home'
},
{
path: '/home',
component: () => import('../components/Home.vue')
},
{
path: '/about',
component: () => import('../components/About.vue')
},
{
path: '/user/:id',
component: () => import('../components/User.vue')
}
]
|
嵌套路由
实现在一个路由中细分出子路由。
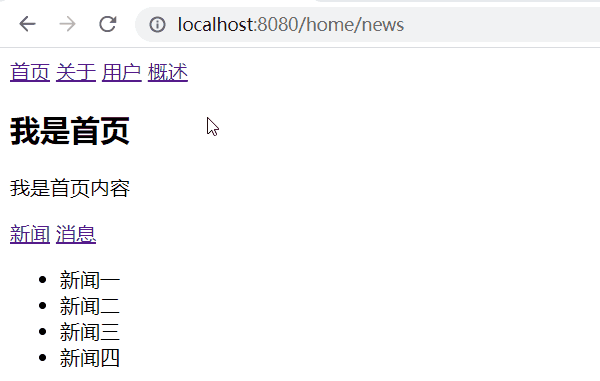
下面以一个案例来说明,想要在home首页中添加新闻(/home/news)和消息(/home/message)内容:
首先新建两个组件:
HomeNews:
1
2
3
4
5
6
7
8
9
10
11
12
13
14
15
16
17
18
19
20
| <template>
<div>
<ul>
<li>新闻一</li>
<li>新闻二</li>
<li>新闻三</li>
<li>新闻四</li>
</ul>
</div>
</template>
<script>
export default {
name: "HomeNews",
}
</script>
<style scoped>
</style>
|
HomeMessage:
1
2
3
4
5
6
7
8
9
10
11
12
13
14
15
16
17
18
19
20
| <template>
<div>
<ul>
<li>消息一</li>
<li>消息二</li>
<li>消息三</li>
<li>消息四</li>
</ul>
</div>
</template>
<script>
export default {
name: "HomeMessage",
}
</script>
<style scoped>
</style>
|
然后在index.js文件中导入这两个组件,并在配置的home路由中添加children属性,该属性同样为一个列表,里面可以添加多个子路由对象:
1
2
3
4
5
6
7
8
9
10
11
12
13
14
15
16
17
18
19
20
21
22
23
24
25
26
27
28
| const routes = [
{
path: '/',
redirect: '/home'
},
{
path: '/home',
component: Home,
children: [
{
path: 'news',
component: News
},
{
path: 'message',
component: Message
}
]
},
{
path: '/about',
component: About
},
{
path: '/user/:id',
component: User
}
]
|
最后在Home.vue文件的模板中加入<router-link>和<router-view>的标签:
1
2
3
4
5
6
7
8
9
| <template>
<div>
<h2>我是首页</h2>
<p>我是首页内容</p>
<router-link to="/home/news">新闻</router-link>
<router-link to="/home/message">消息</router-link>
<router-view></router-view>
</div>
</template>
|
注意to属性的子路由路径写法。
如果想像home首页一样添加默认路由,利用同样的方法在index.js文件中的home路由中进行配置,添加默认路由并设置重定向:
1
2
3
4
5
6
7
8
9
10
11
12
13
14
15
16
17
18
19
20
21
22
23
24
25
26
27
28
29
30
31
32
| const routes = [
{
path: '/',
redirect: '/home'
},
{
path: '/home',
component: Home,
children: [
{
path: '/',
redirect: 'news'
},
{
path: 'news',
component: News
},
{
path: 'message',
component: Message
}
]
},
{
path: '/about',
component: About
},
{
path: '/user/:id',
component: User
}
]
|
效果如下:

参数传递
利用router-link标签:
之前在动态路由的部分讲过利用$route属性和params关键词进行参数传递。
下面介绍利用query进行参数传递。
URL格式:
协议类型://主机:端口/路径?查询
scheme://host:port/path?query#fragment
首先创建一个Profile.vue文件:
1
2
3
4
5
6
7
8
9
10
11
12
13
14
15
16
17
| <template>
<div>
<h2>我是概述</h2>
<p>{{$route.query.name}}</p>
<p>{{$route.query.age}}</p>
</div>
</template>
<script>
export default {
name: "Profile"
}
</script>
<style scoped>
</style>
|
说明:
$route.query.name:获取URL中传来的name参数
$route.query.age:获取URL中传来的age参数
然后在index.js文件中导入,并在routes中添加Profile的路由(这里不做展示)。
在App.vue中使用<router-link>和<router-view>的标签进行路由链接和展示:
1
2
3
4
5
6
7
8
9
10
11
12
13
14
15
16
17
18
19
20
21
22
23
24
25
26
27
| <template>
<div id="app">
<router-link to="/home" >首页</router-link>
<router-link to="/about" >关于</router-link>
<router-link v-bind:to="'/user/'+userID" >用户</router-link>
<router-link :to="{path: '/profile', query: {name: name, age: age}}">概述</router-link>
<router-view></router-view>
</div>
</template>
<script>
export default {
name: 'App',
data() {
return {
userID: '0000',
name: '花猪',
age: 18
}
},
}
</script>
<style>
</style>
|
说明:
利用v-bind绑定to属性,其值可以为一个对象,对象中的path参数即为链接路由的路径,query即为要传递的参数,也是一个对象。
效果如下:
利用方法
如果想设计按钮跳转路由并进行参数传递,可以编写方法:
先介绍params的实现,在App.vue中编写如下代码:
1
2
3
4
5
6
7
8
9
10
11
12
13
14
15
16
17
18
19
20
21
22
23
24
25
26
27
28
29
30
31
| <template>
<div id="app">
<router-link to="/home" >首页</router-link>
<router-link to="/about" >关于</router-link>
<button @click="userClick">用户</button>
<router-view></router-view>
</div>
</template>
<script>
export default {
name: 'App',
data() {
return {
userID: '0000',
name: '花猪',
age: 18
}
},
methods: {
userClick() {
this.$router.push('/user/' + this.userID)
}
}
}
</script>
<style>
</style>
|
再介绍query的实现,在App.vue中编写如下代码:
1
2
3
4
5
6
7
8
9
10
11
12
13
14
15
16
17
18
19
20
21
22
23
24
25
26
27
28
29
30
31
32
33
34
35
36
37
38
39
40
41
| <template>
<div id="app">
<router-link to="/home" >首页</router-link>
<router-link to="/about" >关于</router-link>
<button @click="userClick">用户</button>
<button @click="profileClick">概述</button>
<router-view></router-view>
</div>
</template>
<script>
export default {
name: 'App',
data() {
return {
userID: '0000',
name: '花猪',
age: 18
}
},
methods: {
userClick() {
this.$router.push('/user/' + this.userID)
},
profileClick() {
this.$router.push({
path: '/profile',
query: {
name: this.name,
age: this.age,
}
})
}
}
}
</script>
<style>
</style>
|
利用方法进行路由跳转和参数传递的实现跟在<router-link>标签中的写法一致。
一般有大量的数据传递的时候用query的方式(因为可以传递对象)
导航守卫
现在考虑这样一个需求,在进行路由跳转的同时改变页面的标题,这就需要导航守卫:
首先需要在index.js文件中的routes里对各个路由添加meta对象,里面存放着网页title信息:
1
2
3
4
5
6
7
8
9
10
11
12
13
14
15
16
17
18
19
20
21
22
23
24
25
26
27
28
29
30
31
32
33
34
35
36
37
38
39
40
41
42
43
44
45
46
47
48
| const routes = [
{
path: '/',
redirect: '/home'
},
{
path: '/home',
component: Home,
children: [
{
path: '/',
redirect: 'news'
},
{
path: 'news',
component: News
},
{
path: 'message',
component: Message
}
],
meta: {
title: '首页'
}
},
{
path: '/about',
component: About,
meta: {
title: '关于'
}
},
{
path: '/user/:id',
component: User,
meta: {
title: '用户'
}
},
{
path: '/profile',
component: Profile,
meta: {
title: '概述'
}
}
]
|
然后在index.js文件中直接调用router对象中的beforeEach方法,该方法的参数是调用另一个方法,有三个参数(当路由进行跳转时就会调用这个函数):
1
2
3
4
5
6
7
8
9
| const router = new VueRouter({
routes,
mode: 'history',
})
router.beforeEach((to, from, next) => {
window.document.title = to.meta.title
next()
})
|
说明:
效果如下:

这时有一个问题,即默认页面的标题显示的是undefined,页面也没有报错,于是尝试在控制台打印输出一下to对象:
1
2
3
4
5
| router.beforeEach((to, from, next) => {
window.document.title = to.meta.title
console.log(to);
next()
})
|
可以看到在home(默认)页面下的meta为空

但是在matched(列表)中,可以看到在列表的第一个元素中有meta对象,里面存在页面title(查看后发现其他页面同样如此)
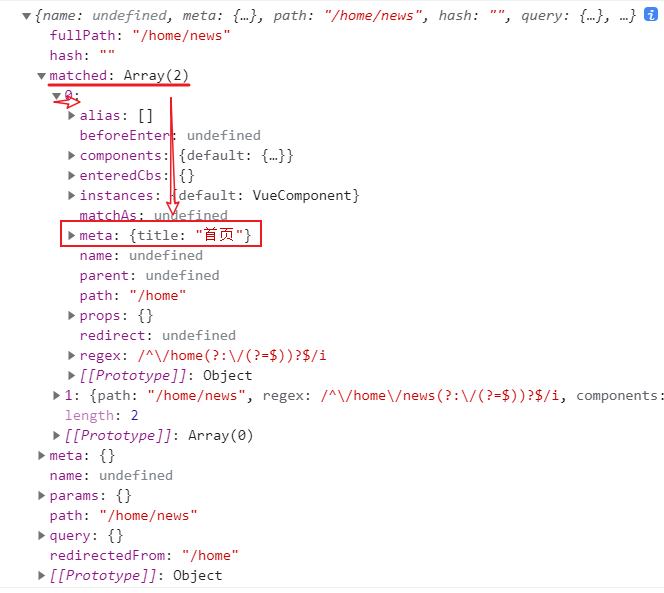
于是调用matched中的title就可以了:
1
2
3
4
| router.beforeEach((to, from, next) => {
window.document.title = to.matched[0].meta.title
next()
})
|
导航守卫的补充
主要的有:
- 全局前置守卫
- 全局解析守卫
- 全局后置钩子
- 路由独享的守卫
- 组件内的守卫
关键就是在路由进行跳转的时候,可以自动实现的回调函数。(这里不做详细说明)具体用法见官网:导航守卫 | Vue Router (vuejs.org)
keep-alive标签
生命周期
在介绍<keep-alive>标签之前先要了解一下Vue中关于生命周期的函数:
| 生命周期函数 |
说明 |
| beforeCreate() |
组件被创建,但处于组件属性计算之前的状态,如data属性还未被加载 |
| created() |
组件实例创建完成,组件属性也已经绑定 |
| beforeMount() |
模板编译/挂载之前 |
| mounted() |
模板编译/挂载之后 |
| beforeUpdate() |
组件更新之前 |
| updated() |
组件更新之后 |
| beforeDestroy() |
组件销毁前调用 |
| destroyed() |
组件销毁后调用 |
| activated() |
组件处于活跃状态时调用(依赖于keep-alive标签) |
| deactivated() |
组件处于非活跃状态时调用(依赖于keep-alive标签) |
下面以home(首页)为例来说明(函数直接在vue对象中创建):
1
2
3
4
5
6
7
8
9
10
11
12
13
14
15
16
17
18
19
20
21
22
23
24
25
26
27
28
29
30
31
32
33
34
35
36
37
38
39
40
41
42
43
44
45
46
47
48
49
50
51
52
53
54
| <template>
<div>
<h2>我是首页</h2>
<p>我是首页内容</p>
<router-link to="/home/news">新闻</router-link>
<router-link to="/home/message">消息</router-link>
<router-view></router-view>
</div>
</template>
<script>
export default {
name: "Home",
data() {
return {
}
},
beforeCreate() {
console.log('组件被创建,但处于组件属性计算之前的状态,如data属性还未被加载');
},
created() {
console.log('组件实例创建完成,组件属性也已经绑定');
},
beforeMount() {
console.log('模板编译/挂载之前');
},
mounted() {
console.log('模板编译/挂载之后');
},
beforeUpdate() {
console.log('组件更新之前');
},
updated() {
console.log('组件更新之后');
},
beforeDestroy() {
console.log('组件销毁前调用');
},
destroyed() {
console.log('组件销毁后调用');
},
activated() {
console.log('组件处于活跃状态时调用(依赖于keep-alive标签)');
},
deactivated() {
console.log('组件处于非活跃状态时调用(依赖于keep-alive标签)');
}
}
</script>
<style scoped>
</style>
|
效果如下:

keep-alive
由上图看以看出,在每点击一次路由跳转,原来的组件就会被销毁,进而创建一个新的组件,而如果想实现路由跳转后仍保留原有的状态,就需要<keep-alive>标签:
使用方式:只需要包裹要展示的<router-view>标签。
App.vue文件:
1
2
3
4
5
6
7
8
9
10
11
| <template>
<div id="app">
<router-link to="/home" >首页</router-link>
<router-link to="/about" >关于</router-link>
<button @click="userClick">用户</button>
<button @click="profileClick">概述</button>
<keep-alive>
<router-view></router-view>
</keep-alive>
</div>
</template>
|
效果如下:
activated()、deactivated()方法生效- 跳转至新路由时组件不会销毁
- 重新返回该路由时不会重新创建

由上图可以看出<router-view>标签产生了作用,但是这里有一个问题:
在跳转user(用户)之前的首页是处于home/message(消息)子路由的,然而重新回到首页之后又自动换为了默认的home/news(新闻)子路由。为了解决这一问题需要activated()函数以及beforeRouteLeave()函数(组件内的守卫),在首页路由离开前获取当前path信息,并进行更新:
1
2
3
4
5
6
7
8
9
10
11
12
13
14
15
16
17
18
19
20
21
22
23
24
25
26
27
28
29
30
31
| <template>
<div>
<h2>我是首页</h2>
<p>我是首页内容</p>
<router-link to="/home/news">新闻</router-link>
<router-link to="/home/message">消息</router-link>
<router-view></router-view>
</div>
</template>
<script>
export default {
name: "Home",
data() {
return {
path: this.$route.path
}
},
activated() {
this.$router.push(this.path);
},
beforeRouteLeave (to, from, next) {
this.path = this.$route.path;
next()
}
}
</script>
<style scoped>
</style>
|
问题得到解决:

此外,如果有一些路由不想对其进行状态保留,可以在<keep-alive>标签中添加exclude属性,例如:跳过对user(用户)和profile(概述)路由的状态保存。
1
2
3
4
5
6
7
8
9
10
11
| <template>
<div id="app">
<router-link to="/home" >首页</router-link>
<router-link to="/about" >关于</router-link>
<button @click="userClick">用户</button>
<button @click="profileClick">概述</button>
<keep-alive exclude="User,Profile">
<router-view/>
</keep-alive>
</div>
</template>
|
注意:
exclude属性:其值为每个路由在最初创建时的name属性- 如果在该属性中添加多个路由信息,逗号之间不允许存在空格(否则会出错)
后记
可以分担后端的一部分压力。